 First thing you want to do is upload your picture and crop it. Now you should have this:
  Click on exposure and slide the bars around until your picture looks pretty good, for me, I always slide both the contrast and exposure up a little:
  Save it and click on colors, now slide the saturnation bar up until you like your picture. If you want to change the color around, slide the bottom bar/slider. Just play around with it until you like your picture... don't make it look too edited:
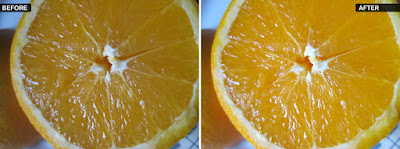
  I just put it in the before/after format for you to see the difference:
  This takes probably 2- mins from waiting for it to upload to waiting for it to save. :D You can also do this on Photobucket, but I like Picnik because the "atmosphere" of the website just makes you happy! Photobucket and Photoshop are just all grey and boring... sort of depressing! Aaand Picnik is free! Photobucket is too, and I just use mine to get the image direct link when I make buttons and stuff! :D Hope that helped! I'll do some more tutorials of cool effects you can do with your pictures on Picnik! :D
Have a good Sunday! Be happy!
Randomness of the day:I like banjo type music for some reason!
(I think i am going to start doing ^that! lol!)
Aly

4 comments:
this is cute. i love altering images. however, i never have the time to even do it. all of my photo shoots are usually unedited, unless my photographer did so.
but yes girl, i will do more tutorials on hair. i just have 0 time during the week, ad by the weekend, i have to catch p on everything else i was supposed to get done during the week!
and SITS, just go to their page, grab the button, and start commenting on a featured blogger. ive gotten traffic that way.
I love Picnik! I'm always shocked that more people don't use it. I'm a freelance clothing designer and I think all the apps over there are perfect for correcting lighting issues, etc. Great tutorial! =)
Kristina J.
Gah so cool! :D I'm gunna try picnik! It looks fun :D
I was looking for picnik tutorials and found your blog. I love it! I really like the tutorials and pictures you put up.
I'm following :)
~Hannah~ http://hannie96.blogspot.com
Post a Comment