
Today I'm going to show you how to completely edit a face, and how I use the airbrush feature on Picnik without cheating or Premium Membership. :D YAY for figuring this stuff out! :P
Here is my before and after, it so easy, a caveman could do it!:
 (if you want/need to see the pictures larger just click on them.)
Upload your pic and use 'blemish fix' if you need to. I need to.
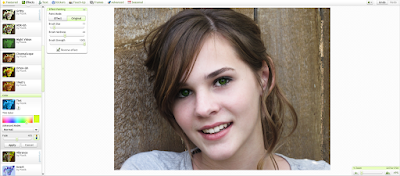
 Go to 'Effects' then 'tint' then slide the dot to white and change the setting from 'normal' to 'hardlight', Now fade it so it looks good:
 Click 'apply' and repeat but this time choose 'reverse effect' and paint it on your eyes (sometimes you can do your mouth too.) Fade it until it looks right and 'apply'.
 I colored my eyes using tint, too
 For airbrushing version #1 go to 'doodle' and select a color really close to the medium/light color of your skin
 Draw the color all over your face and then fade to your liking:
 Here's what this effect will look like:
 There is another way to 'airbrush' though, so keep reading... You go to 'soften' and 'paint' it on just like 'airbrush'.
 Here's what it should look like now:
 Here I whitened my teeth and used a stronger blur under my eyes (though you can't tell):
 Here is the before and after:
 Haha! Don't judge the 'before'! :P
