Today we have my bestest blogging friend, Naomi, here with a tutorial on how to make a jersey cardigan! I'm so excited! Naomi is by far the awesomest person I've ever met in the bloggisphere. I'm so glad to have her on my little old blog!
........
Hi everyone! I'm Naomi, also known as Nay or Nay-nay,
from Sweet Lemonayde. I am a teen who loves to do sewing and crafting and all
other types of fun things!
I am so honored to be guest posting here! This is my very
first guest post, so tell me if I'm doing something wrong. Here's a picture to
describe my coolness:

Yep, that's me...
Okay, truth be told when Alyssa asked me to guest post, I
instantly said yes. Not because I actually had a project in mind but because I
desperately wanted to be on her awesome blog. So I said yes. Only I wasn't sure
what project to make, but I didn't want to take a long time to get it to her. So
when I went to the fabric store, I grabbed some jersey and started my project
that day! And this is what became of it...
A draped cardigan! I've seen these everywhere and I love
them! Except that they don't have a hood. :( So... I added one! Cuz that's what
seamstresses do (which is why we have an advantage over everyone else, in my
extremely unbiased opinion)! The draped part is extra wide and can be pulled up
for a hood if you want it to, and you can wrap your cardigan in multiple
ways;
Open:
Open and belted:
Wrapped and tied:
Hooded, wrapped, and tied:
Try to come up with your own variations!
This project is fairly easy; cutting out the pieces took
more time than to sew it together!
So, what you'll need:
Materials
-2 yards of jersey knit material. I had some lavender
jersey. Purple's not really my color, but what can you do? It was 99 cents a
yard!
-sewing machine
-thread
-scissors
-tape measure
-long sleeved tee that fits you well (or you could use a
t-shirt pattern)
1. Cut out your front and back pieces out from the
fabric, following your long sleeved tee as a guide. I just folded the sleeves
behind the shirt and traced it. You can lengthen the shirt; I lengthened it so
that it reached my knees.
2. Cut a v neck from the front, and then cut your front
piece in half. Now round the points on the front.
3. Fold your material in half and cut out 2 sleeves on
the fold, using your tee as a guide. You can add cuffs if you want. You can cut
a long strip for a belt, too.
4. Measure around your front neckline; up the front,
around the neck, and back down to the bottom. This number is x.
6. Time to sew! With right sides together sew the
shoulders of the 2 front pieces to the shoulders of the back piece. Don't turn
it right side out yet.
7. You should have what looks like a vest.
Lay
it out flat. Take your sleeve and pin it to the armhole, right sides
together.
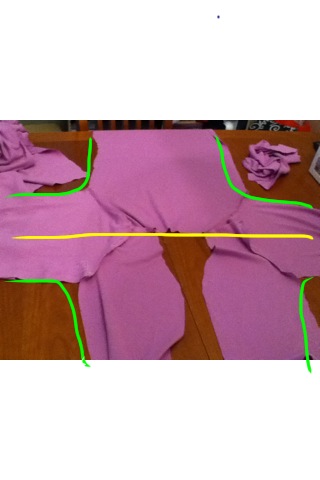
Sew it on, and repeat with the other side. Flat, it
should look like this:
9. Sew the 15" strip around the neckline and down each
side, right sides together. You may need pins for this part. If the strip is a
bit short, just stretch it out evenly along the neckline.
10. You're finished!
There's your lovely cardigan. These are all pics of my
sister modeling. As you can see, she likes her poses and such...
I guess we both are a bit odd, don't you think?
Come by and check out my blog for more tutorials! Thanks
so much Alyssa for having me! Have a great day everyone! :{ (i stole the
mustache guy from Alyssa, haha)
o(^__^o)
Thanks Nay! I love it! Can't wait to make one... though it'll probably take me awhile... I'm not so great at sewing, but you made it look easy! :{
{oh... everyone go follow her blog... it's the bomb.com}


10 comments:
Cute project! And I'm really loving that lilac jersey.
That turned out Cute
This is awesome! love the style. I am featuring it at somedaycrafts.blogspot.com. Grab my "featured" button.
Lovely! I'm a Noemi's follower, and she always amazes me with her creativity. I have a black knit fabric... Hummm, I must do something with!
guess great minds think alike... yesterday did you see my deleted comment? i was going to say that house of hepworths featured you! my comment was like 'A! house of hepworths featured you! here's the link!' blah blah blah then saw your comment on house of hepworths and felt totally stupid haha. :{ now i can't stop smiling! you're at 89 followers and i'm at... 62! whoo! very, very, extremely close numbers (though i must admit i'm jealous of your extra 27 followers). and i linked you too, so now your post is the most viewed on my blog! i'm still smiling and biting my lip :D
Love it! So simple to make, yet so versatile to wear. Great job!
Love it! I linked to your tutorial on Craft Gossip Sewing:
http://sewing.craftgossip.com/tutorial-drapey-knit-cardigan/2011/08/02/
(link will go live tomorrow morning)
--Anne
You are so awesome! Love the tutorial, good luck with your blogging!
Naomi, you and your sis are so funny! Love the tute, I'll haveta try it sometime. xx
The tutorial was awesome! I d like to try making it soon one of these days
Post a Comment