
Hey followers of Live. Love. Craft.!
I'm Megan, I blog over here: makinglemonadebymegan.blogspot.com :)
{I kind of slacked in the blogging area this
summer... so I hope you'll forgive me!}
Today I am going to show you a tutorial of mine,
which was inspried when I was surfing on none other than Pinterest.
I saw this scarf here: http://pinterest.com/pin/157877472/
and knew I had to figure out how to make
it.

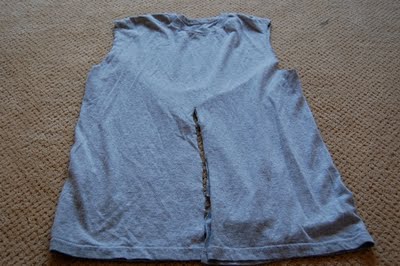
1. Start with two {size
medium I think} plain t-shirts, in very good condition. You can use knit fabric,
but I didn't have enough handy, so I used t-shirts.. worked just
fine!

2. Cut of the sleeves and
cut down the middle and sides, so you have four pieces of
fabric.
3. Take two of the pieces
above and sew them {right sides together} to make on large
strip.
(sorry I switched to orange here for the
tutorial... but you follow the same steps for each color)

4. Fold over {right sides
together!}

5. Sew down the sides,
making a tube.

6. Turn right side
out!
7. Repeat steps 1 - 6 with
the other t-shirt.
So far you should have two tubes of fabric like
this:

This is about the part that I had to get really
creative to do the braid. So bear with me as I create this "braid" in a very
non-professional way. ;)
8. Take a random strip of
fabric and tie the ends of the two tubes together {don't freak out...
this will create a circle so that we can create the "braid"}
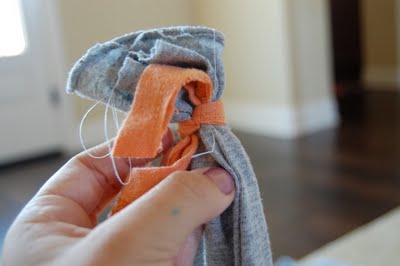
9. Set your pieces up how
you see them in the picture right below. {make sure your ties are at the very
end}

Apparently, my brother says this is a square
knot. I looked it up:) it's KIND OF like a square knot... But we'll just going
to call it a square knot.
10.:

You may
have to read this a few times and study the picture below... but don't give up!
It can be a little confusing
11.
There's two ways I can explain this.
The 1st way: Take the ORANGE knot {on the right}. It
should be on the bottom. Bring it up and through the middle of the gray
fabric.
Now, Bring the GRAY knot {the left}, and bring it
down and through the orange fabric. {sorry the picture doesn't show the gray
part well}
Or
simply....
Tie another "square knot", so it's a double square
knot.

13. Once you pull it tight
you should end up with something like this:


14. Untie the ties at the
end.
15. Fold over and iron the
gray tube so it has a nice edge.
16. Tuck the orange tube
inside the gray tube.

17. Sew.

18. Repeat steps 15-17 with the remaining tubes.
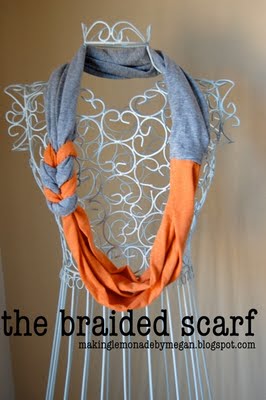
PHEW! Did you make it? It's a little more difficult tutorial, but it is SO
worth it, I mean, you now have a super cute scarf for a fraction of the cost it
would take to buy one. :)


If you have any questions, feel totally free to email me :) just visit my
blog and you will find the contact info there!
Thanks for having me Alyssa!
<><><><><><><><><><><><><><><><>
Isn't that so beautfiul?! I love it! Thank you so much, Megan for coming... and for my dear following buddies you should go check out my tutorial on HER blog ;) Here's a peek:
 Whups... it's sideways... oh well, go HERE to see it!
Please follow me! I'll be having a 200 follower giveaway soon, and I'm SO excited!
Alyssa
<><><><><><><><><><><><><><><><>
Isn't that so beautfiul?! I love it! Thank you so much, Megan for coming... and for my dear following buddies you should go check out my tutorial on HER blog ;) Here's a peek:

Please follow me! I'll be having a 200 follower giveaway soon, and I'm SO excited!
Alyssa
18 comments:
It's pretty.. the steps seem a little complicated but I'll sure try it :)
Thanks for sharing, now headed to check yours out
I love this!!!!
I really need to get my sewing machine up and running
This is fabulous! There are so many color combinations you could do . Thanks for the well versed tutorial! I would love for you to share this @ Show & Share!
http://southernlovely.blogspot.com/2011/09/show-share-5.html
um, OMG, I LOVE THIS!!!! Like, LOVE LOVE LOVE! Thanks for being awesome and posting! :)
Awesome scarf! i love the look! I am featuring this at somedaycrafts.blogspot.com.. Grab my "featured" button.
Thanks for your comment:) Ahhh that is soooooo cool!! ;) thanks so much for the opportunity!!!
Love it. Thanks for sharing
I made the scarf! It was trial and error for sure, but I worked it out! I made it as a practice scarf for my first sewing project, and am proud of my results! Is there any way to leave you a picture of it?
Awesome! I'm so glad you made it! If you'd email me the picture I'd LOVE to post it! :) teardrop@kc.rr.com THANK YOU!
Sooo cute! I'll try this for sure!
My young doughter would love it and finally have a scarf she WANTS to wear without any discussion.
Can you just eyball it for me and tell me how long each tube is? I need to make a little bit smaller one as she is just 5!
I reuse t-shirt too but I make necklaces bracelets earrings. You can check my work in my blog: http://bas-redesign.blogspot.com/
Thanks for sharing.
Bas
Thank you for the post I really enjoyed it. I featured this post on my blog. Hope you have a beautiful day! http://swbeautifullife.blogspot.com/2011/10/blog-hop-2.html
This a great tutorial. I made one this Christmas as a gift. I found my tutorial on http://www.putapuredukes.com/2011/09/braided-scarf-tutorial.html
It was very simple for beginners like me.
Either way, a great scarf!
I, for one, would like to know where that dress form came from.
I love this scarf! I'm planning on making a few for Christmas this year. However, I have a few questions... When I cut the first shirt, it would be in four pieces right? If that is the case, then it seems like from your tutorial that I could make two scarves for every two shirts I use. Is that right?
Thanks!
From a lifestyle standpoint, modern artistic bottles and tumblers complement the idea of mindful living. Using a thoughtfully designed, visually appealing product encourages users to pause and savor small moments—whether it’s enjoying a morning coffee or staying hydrated throughout a busy day. This mindful engagement turns everyday routines into intentional experiences, enhancing both well-being and overall satisfaction.
https://colornjoy.com/products/spooky-doll-halloween-water-bottle-coloring-activity
https://colornjoy.com/products/dragon-adventure-water-bottle-kids-coloring
https://colornjoy.com/products/space-crew-coloring-water-bottle-kids-educational-toy
https://colornjoy.com/products/hedgehog-explorer-coloring-water-bottle-outdoor-toys
Post a Comment