
Today I'm going to show you how to do something similar to the Picnik Premium's 'mascara' or 'eyebright', or 'eye color' for free (with no cheating !). I know many people cheat and use the snipping tool on their computers to get the picnik premium features. I really like the eyebright feature, so I found a way to re-create it using the free version of Picnik. Upload your picture:
 adjust the contrast and exposure so it looks a little better:
 Go to 'tint' under the effects button. Slide the color to white and change the setting from 'normal' to 'hardlight'.
 click 'reverse effect':
 Now 'paint' the outline of the eye, around the iris, and the pupil.
 Fade it and 'apply'. If you want to add more color to your eye select 'tint' again but this time just choose the color you want and select 'reverse effect' again. Fill in the iris with this:
 I always fade mine so it doesn't look weird, and then I wanted mine to have some yellow/brown in the center, so I did that using the same technique:
 Check out the before and after!
 The picture went from looking sort of crummy, to very professional looking.
 Thank you for reading this tutorial! Let me know if you liked it and if you have any questions! I'd love to answer! :D
 Upload your picture:
 adjust the contrast and exposure so it looks a little better:
 Go to 'tint' under the effects button. Slide the color to white and change the setting from 'normal' to 'hardlight'.
 click 'reverse effect':
 Now 'paint' the outline of the eye, around the iris, and the pupil.Fade it and 'apply'. If you want to add more color to your eye select 'tint' again but this time just choose the color you want and select 'reverse effect' again. Fill in the iris with this:
 I always fade mine so it doesn't look weird, and then I wanted mine to have some yellow/brown in the center, so I did that using the same technique:
 Check out the before and after!
 The picture went from looking sort of crummy, to very professional looking.
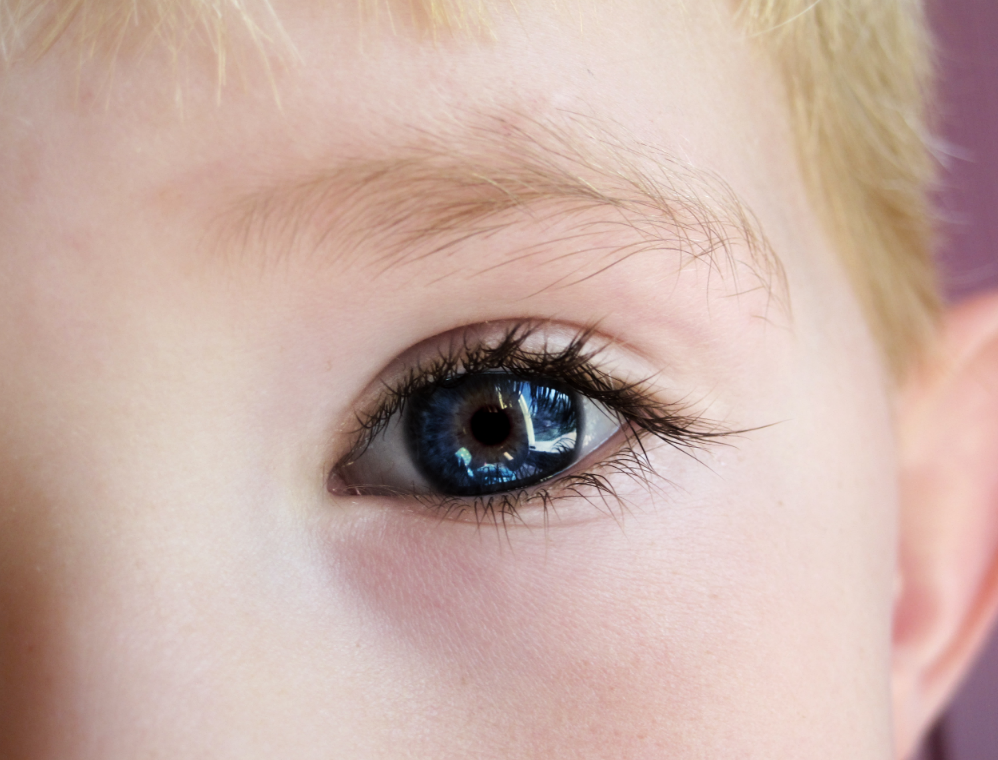 Thank you for reading this tutorial! Let me know if you liked it and if you have any questions! I'd love to answer! :D
Have a beautiful day,
Alyssa
10 comments:
SOUNDS like agood idea--I will have to give it a try! Thanks!! :)
Thanks! I just tried it! I've also try to whiten my eyes with Whiten Teeth function so that my brown eye looks more brown..^___^
Hey- glad you enjoyed my post about blogger stats! I couldn't find your email, but on your dashboard, if you click "stats" then "traffic sources" and scroll to the bottom- thats where they are!
Kitty
Alyssa you lovely gal! How do you learn this stuff? I'm so computarted its not even funny! I hope you're having a lovely week! I hope that god's lovely sun is with you wherever you are - unfortunatley its nowhere to be seen here in oregon hahaha:)
Hey, Alyssa!!! I didn't see an email for you listed anywhere so I figured I'd just write to you on your blog! :)
It's soooo cool to find another Catholic blogger! AND a young teenaged blogger. You don't find many in that combination, lol! :) Welcome to the blogosphere-- wow, it looks like I'm your first follower. Heehee, now I feelz special.
BTW-- please don't take this the wrong way, but just a little blogging tip: I love your font, it works GREAT for post headers and such, but it makes it very difficult to read your posts. Most bloggers use fancy fonts for their headers and then a more typical font like Times or Georgia (my fave) for the post body. Makes it easier to read.
Woah! Super sweet! Thank you!
Hey Alyssa! Just wanted to let you know I linked to this tutorial on my blog!
faeries-and-beads.blogspot.com
Haha, I just realized you already have followers! The google follower gadget has been acting up on lots of blogs lately.
Your tutorials are great! I esp. like your latest one, you are GORGEOUS! Thanks for linking up to the "Get Your Brag On" party!
Brandy
Gluesticks
www.brandyscrafts.blogspot.com
I love you for this now that Picnik is closed and Google+ only chose to adopt a small fraction of Picnik features. Including "eye" bright"........I am overjoyed to find this information, and not have someone tell me to learn photoshop.......I don't have that kind of time. Thank you so much!!!
Post a Comment