Showing posts with label art. Show all posts

Sunday, July 1, 2012

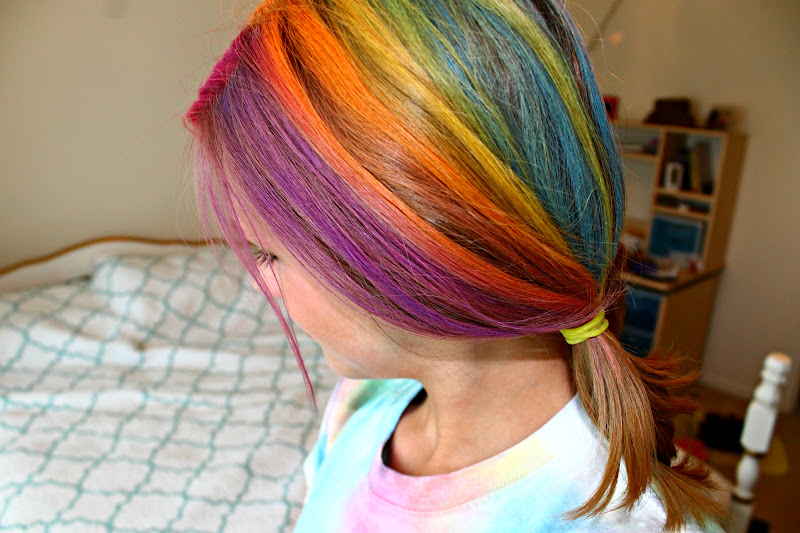
My New Rainbow Hair


Wow I never even finished my little 'journal's! Sorry! I'll get on that if I can! Anyways... I figured I'd update you with a little sumthin :)

Introducing.... my new rainbow hair. :3


 I used soft chalks from michaels and water. :)


{sorry for all the pictures of me............ yah i'm my only willing model in times of boredom. there are many more. it's scary.}


Just experimenting today, and i will be probably for the next two weeks. So expect more wacky hair posts!


Thanks for sticking around guys! I love you all!

Aly

Wednesday, March 14, 2012

//Guest Post: Made in a Day//


Hi! I am Kim and I am Guest Hosting today for Alyssa here on Live Love Craft. My blog, Made in a Day, it is where I share my DIY crafty expertise with the world! I love going to thrift stores and finding unique items to decorate with and make into something totally different or just better than new again.
Today I am going to share how I made the two pics below, I bought them a year ago, and I just couldn't find a place for them and I needed to transform them into a great addition to my sea themed bedroom.
Now they weren't that bad to begin with, but I needed two pics that were pastel, shabby and more up to date. So first I removed the tiles in the center and gave the frame a nice coat of beige satin spray paint. Then I cut light green burlap with a rotary cutter to fit in the inside area of the wood frames. Then decoupage them in with Mod Podge, I did not coat the outside of the fabric, I wanted the burlap to keep its texture. Next I printed out vintage pics of shells on card stock and decoupaged them with Mod Podge onto the tiles. I did decoupage over the top of the pics as well to seal them onto the tile. Hot glue the tiles back to the center of the pic. I then took sandpaper and scuffed up the frame edges, to make them shabby chic.
These turned out really great! I love them they are a perfect addition for my bedroom.
I hope you enjoyed my tutorial! Thank you Alyssa for having me over to share!

Tuesday, December 13, 2011

When Bored and Needing Inspiration...

Grab some of your favorite catalogs, a sketchbook, pencil, and a hot chocolate ;) And turn up the Christmas music. And put your comfy plaid pjs on. :) perfect!

I've been so super busy I haven't had any time for just relaxing and sketching. And I was 3 months behind on my Anthro catalogs... so I grabbed everything on my list ^ {up there} and hopped on my bed. :) Blasted Christmas music while looking through the catalogs and sketching things I liked / could DIY :) Made me feel much more crafty again!

And just for the record... I am starting to highly dislike Anthro's clothes/the styling and pairing of them. There were a few I just hated. Haha so I flipped to the back to look at decor ;)

{these were all my 'DIY' knock off ideas. let's see if i ever get around to them!}
OHMYGOSH this model's face drove me nuts in a few pics. No offense. Haha she looks better smiling....

Alrighty, well that's it! moral of today's post:

When feeling un-inspired... pick up a catalog and draw mustaches on all the models. Ok... not really. The moral is you should take some time for yourself and i've found that finding things to knock off is very creatively inspiring. :) It gets your brain a-thinkin' about how to make stuff. :D

Photobucket

Sunday, November 20, 2011

tutorial - easy 'space nails'

I kinda like them. just a ton. haha :) you can see i dented the 3rd finger pretty badly... oh well. Life goes on :)

so I just kind of felt like doing a tutorial... there really isn't a need for one, but you know why not?

these are the colors I used. I have NEVER payed over $2 for a bottle of nail polish, so ... yeah. I use NYC's $1 version :) and I find they actually work pretty well... the shimmery ones look really nice if you layer 2 similar colors. The one in the middle is some random thing I got a few years ago in one of those $5 big packages full of cruddy kid makeup. It was a gift haha :)

and then i used a mini glitter polish I've had since I was 4. Yes, 10 years. Haha :) oh, and for the record I do paint my nails very messily, and the excess washes off when you wash your hands... so I find that works better for me than missing some of the spots of my nails by my skin :)


awkward self pic :P haha
Someday I will get those little sponge thingies and do these... someday. {I'm a procrastinator... so maybe never.}

 So those were my little 'knock off' easy version of the beauties above :) They actually look much more 'deep' in real life. i like them :)

Thanks for reading!

Photobucket

Sunday, November 13, 2011

Tutorial: Jesus Painting

It's a very uncommonly known fact that I do art because I never post it on my blog... But I do and I have been for pretty much my whole life ;) So when I had a guy ask me to do a picture with John 3:16 on it... i immediately said yes! And along the way I took pictures... so I suppose this is a step by step :)

I quickly sketched it...
And I was really stupid back when I did this because I decided to use watered down acrylics instead of actual watercolors... I wanted the staying power of the acrylics. But I really don't like how they came out because it dried really quickly... But oh well... I learned a lesson. That's the best thing about making mistakes :)
painted his skin...

I used a light wash of the brown acrylic, I scraped a wood design with the back of my paint brush, and then used another wash which stuck in the indents I made. So I think that worked pretty well for never having done it before :)

added his hair...

added the eyes and lips...

added more detail...

added the grey sky and his tear...

added the crown of thorns {which is REALLY hard to do. FYI. That's why it looks so bad.} and blood...
and then I pulled it up in picnik and edited it. I softened his skin because it was really streaky and I enhanced his eyes a little. I also {you can't really tell} added some lights and darks to contour his face. And I added the verse.

I'm pretty proud of it... :) And the man who bought it was very excited, which was the best part :)

So thanks for reading... love you all!

Photobucket